Saturday, March 1, 2014
Family Room Den Ideas
Hey there! Hope everyone is having a great week! I finally finished up the den and I am so tickled with it. I decorated the room for my hubby because it is where he likes to relax with our boys and so I thought it would be fun to fill the room with some of the things he loves most. I started the redo by building this reclaimed wood shelving unit. He had asked for a unique shelf to display some of his collections. Then when he came home with this colorful minnow basket, I decided to use it for inspiration for the rest of the room. Heres what I came up with.
 Because of the cheerful bright colors on the minnow bucket, I chose red, white and black for the color scheme of the room. I wanted the space to have a nautical/lake house/coastal vibe to it. So, big bold stripes were perfect. I ordered the fabrics for the pillows at fabric.com. The rug I already had and purchased from Lowes several years ago. The roman shades I made from old cheap mini blinds and drop cloth that I painted grain sack stripes on in barn red. Here is a fantastic tutorial on how to make them.
 This coffee table is a storage chest that my dad built for me many years ago and its super heavy. So when hubby came home with another set of gorgeous vintage castors, I thought it would be pretty cool to attach them to the chest to make it more mobile. Plus, I love the charm it adds to a very special piece.
 Our den is at the base of the stairway, which is getting ready to receive a major overhaul, as well. Cant wait for that one!
 I painted the Boat Dock and Bait Shop sign on old barn wood and attached a fill it strip to the back. The oar came from an old barn but I added the number with grey craft paint, and gave it a bit of distressing.
I was super excited about this project. Im sure some of you have seen this burlap board from Pottery Barn.

To keep the board inside the frame, I used heavy duty staples and a staple gun. Voila! Because I had everything to make this except the foam board and dowel rods, this project only cost me 10 bucks!
 Hes totally happy with it and its perfect for some of the small paper items that my husband collects, like old drive in movie calenders from 1962, vintage maps and post cards, old metal movie reels, and anything else he or the boys wants to stick up there. Does anyone else think that metal movie reel looks like a steering wheel on a boat?? I also hung the vintage maps we found when we went out thrifting one weekend.
 This TV console is an old record player cabinet that hubby found on a picking adventure. The record player didnt work so we pulled it out and decided to use it for our TV console and game system for the kiddos. I love it, its solid wood and didnt need anything done to it at all. I even liked the hardware.
 Picked this basket up at a yard sale and love it! Love the cool texture it adds to the room.
 Heres hubbys shelf. He filled it with his collection of minnow buckets (I love that chippy green one, thinking about sticking some fresh flowers in it, if hell let me, lol), a vintage fishing reel, an old pump gauge from a fire truck (my hubby is a fireman) and hes got several other things going on it when he makes up his mind. :)
 Hes pretty excited about the possibilities. I love that. :)
 The white chair is my favorite part. It used to be an everyday suede arm chair that was starting to show its wear, so, thanks to a good friend, I got an Ektorp chair cover for only 29 bucks at Ikea. I was determined to make it fit, and I did, by golly. It fit perfectly and I was so excited! Like the kind of excited you get when youre a kid waiting for Christmas morning. :) I couldnt sleep!! For only $29, its like we got a completely new chair! And Ive heard that you just throw them in the wash and bleach them when they get dirty.
 Were both super happy about the room and he finally has a place to display the things he loves. Oh, I switched couches with the living room and den simply because this couch is so much more comfortable and he likes it better. So the newly upholstered couch is in the living room where decorating changes for fall will start soon. Im ready, so tired of this intense heat, even though summer is our favorite time of the year. Anyone else ready for fall?

 Have a great day friends!
Read More..
I was super excited about this project. Im sure some of you have seen this burlap board from Pottery Barn.
via
Well, I thought it would be kinda cool to make so I bought a tri-fold foam board, covered it in canvas, then covered it in burlap and stapled everything to the back of the foam board. Then I built a frame with ripped pieces of barn wood because that is what I had, but you could also use 1 x 2s. Before I completely attached everything, I spray painted two small wood dowel rods with oil rubbed bronze spray paint, also because that is what I had on hand, drilled corresponding holes on each side of the frame and inserted the rods. Then I completed the frame and framed the rest of the board. To keep the board inside the frame, I used heavy duty staples and a staple gun. Voila! Because I had everything to make this except the foam board and dowel rods, this project only cost me 10 bucks!

Monday, February 24, 2014
ASS OVER TEA KETTLE union jack
We are well known for our rain here on the west coast. It usually
rains for a long time but its relatively light compared to other
places. Last night was a different story. All of a sudden it poured
like a mid summer Florida storm. I in the mean time was worried
about some items outside so I went to the top of the deck stairs and
started down. Well I made it to the bottom however I was no
longer on my feet. Yes I took a fall the moment my runner stepped
on the wet stair. My hip landed on the ground, but my rib and wrist
hit the concrete.
"GEORGE!!!!"
Well he came and got me back in the house and I was banished to
the bed for the rest of the night with ice.
My hip is bruised, thank god for that extra cheese cake,
my rib feels fine but my wrist is sore.
So today I had to come up with light duty work.
I also couldnt do my regular job because my PC is gone to Future Shop
to be scolded and straightened out, so here I sit getting familiar with Georges PC.
So today I decided to sit still, let my wrist heal and be a creative painter.

Its a beautiful serpentine dresser call *JACK*.
Hes not done but I am for the night.

I also manage to finish a pair of wooden pillar candle holders made in India.
I got them at a yard sale recently to paint and distressed. The
plan is to take them to the community show next week but youll
have to wait and see if I can give them up.


Here are the close ups of the accents I promised the other day
on the lingerie chest I finished. Let me know what you think.
Ambrosia Maple Pen
Phil (on the mountaintop) from Western NC, an excellent and respected woodturner, sent me some of his cutoffs. Included in this was a piece of what he called "Ambrosia Maple." I think others refer to this look as "spalted."
The Ambrosia Maple will be good for a few pens. Here is the first one. It is intended to be for the wife of my neighbor. I made HIM a walnut pen earlier in the afternoon and did this one in the evening.
These are 3 pictures of the same pen.


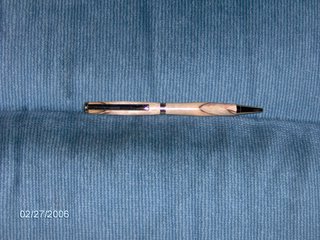
Read More..
The Ambrosia Maple will be good for a few pens. Here is the first one. It is intended to be for the wife of my neighbor. I made HIM a walnut pen earlier in the afternoon and did this one in the evening.
These are 3 pictures of the same pen.


Sunday, February 23, 2014
MISS CHERRY PIE red buffet pt 2
Big Reds sister is completed.


Cherry has nice legs and a brighter glow than her stately brother.
Big Red was waxed and polished from head to toe,
were as Cherry was finished with wipe on poly.


She needed little repairs all over, but we all know
with age comes experience.

Miss Cherry has not traveled too far from home in all her years!

Here is a fresh raw coat of Emperors Silk Chalk Paint on her body.

and the finished coat that topped her off.


Both her doors got magnetic closures.

Her jewelry was pretty but to hang in the pub with all those rough and tumbles
she needed something new to help fit in better.

Shell be catching the eye of many and maybe even a whistle or two.

Cherry will go home to her decorators home for a short stay then she will be off
to her new digs in the Fort Pub.
VENEER repairing bubbles
Heres the third article of the much anticipated VENEER series.
The first article explained how to deal with edge gluing loose veneer
The second article detailed filling in missing areas of veneer on painted furniture.
This time I will show you how to get bubbled surface veneer glued back down.

For these repairs you will need 3 items,
your wood glue, a shape utility knife, and a heavy weight.

In most cases you can see where the veneer has bubbled/lifted but
running your hand over the surface will also help find areas you dont see.

You have to get the glue underneath your veneer somehow.
The next step is the scarey one.

Use your uility knife to cut a slice into the bubble.
Use a sharp knife, and cut in the direction the grain runs.

Apply your glue getting into the cut and under the bubble.

you can use air to blow it under the edges,
do what ever you can think of just be delicate with the edges of the cut veneer.

Wipe up any excess glue with a damp cloth.
Now weigh your repair down.
Below you can see I used a cast iron urn (heavy) on a flat board,
I even used a small bit of folded sandpaper right over the glued spot as a pressure point.

** MINI VENEER TIP **
Wax paper wont stick to glue.
It is a good buffering material to use
between your repair and any clamps or weights you use.
Saturday, February 22, 2014
Garden Tub Ideas
Bathroom Tub Ideas For Your Home – House Plans and More
Bathroom Tub Ideas For Your Home – House Plans and More

Corner Garden Tub and Whirlpool from Jacuzzi
Corner Garden Tub and Whirlpool from Jacuzzi

Read More..
Bathroom Tub Ideas For Your Home – House Plans and More
Corner Garden Tub and Whirlpool from Jacuzzi
Corner Garden Tub and Whirlpool from Jacuzzi
Friday, February 21, 2014
Book Review Lathe Fundamentals The Complete Gude
Good Evening Everyone,
There are a number of books on the market about wood lathes and one of the very best books for beginners is Lathe Fundamentals: The Complete Guide by Popular Mechanics/Rick Peters ( New York: Hearst Books, 2006. ISBN: 978-1-58816-447-6. 192 pages). Many of the books published about wood lathes tend to be written by experts for people who have been turning for a long time or their coverage of all the aspects of wood turning tend to be rather uneven. Lathe Fundamentals covers every aspect of wood turning-from selecting a lathe, the basic types of chisels, and basic techniques. It also goes into more advanced techniques, has a very clearly written section on chisel sharpening and grinding, and an excellent section on lathe maintenance and repair. At the very end of the book are several projects that will help the beginning turner achieve a simple but well made project-it even has a section on pen turning. The book is also is well illustrated with numerous photographs that show step by step how to achieve a given activity. Its very clearly written with a noticeable absence of technical jargon, which I think at times can be a little confusing for the beginning turner.
If you are planning to purchase a lathe and get started as a wood turner, this book is the book you should read before making a purchase. If you plan on purchasing a lathe for someone as a gift, then you should definitely purchase this book.
VW
Read More..
There are a number of books on the market about wood lathes and one of the very best books for beginners is Lathe Fundamentals: The Complete Guide by Popular Mechanics/Rick Peters ( New York: Hearst Books, 2006. ISBN: 978-1-58816-447-6. 192 pages). Many of the books published about wood lathes tend to be written by experts for people who have been turning for a long time or their coverage of all the aspects of wood turning tend to be rather uneven. Lathe Fundamentals covers every aspect of wood turning-from selecting a lathe, the basic types of chisels, and basic techniques. It also goes into more advanced techniques, has a very clearly written section on chisel sharpening and grinding, and an excellent section on lathe maintenance and repair. At the very end of the book are several projects that will help the beginning turner achieve a simple but well made project-it even has a section on pen turning. The book is also is well illustrated with numerous photographs that show step by step how to achieve a given activity. Its very clearly written with a noticeable absence of technical jargon, which I think at times can be a little confusing for the beginning turner.
If you are planning to purchase a lathe and get started as a wood turner, this book is the book you should read before making a purchase. If you plan on purchasing a lathe for someone as a gift, then you should definitely purchase this book.
VW
Subscribe to:
Posts (Atom)